Aviary Brooder Construction
 One of the most important pieces of equipment in the nursery is the brooder. Without dependable brooders many chicks will be lost or encounter developmental problems. The major drawback to most breeders starting out is COST. The thought of spending several thousand dollars to outfit your nursery can be demoralizing, to say the least. Well, maybe the following can help take some of the sting out of setup process.
Some of the drawbacks we encountered with commercial brooders, other than cost, was size. They were all so small that you would only be able to fit two or three containers of chicks in each one. This means that you would have to buy even more, driving the cost higher and higher. Yes, they were all very pretty and had all the bells and whistles, but you don't have to drive a Cadillac just to have dependable transportation.
The brooder pictured here is home made and can be built for around $100.00. We have used this type brooder for many years and have brooded hundreds of babies without any ill effects.
MATERIALS:
Here is what you need:
2 ea.. 4'x8'x1/2" sheets of Melamine
1 ea.. Heating Element, Lyon Electric Co. Model # 9x9, Cat. # 910-042
1 ea.. 110/115 VAC Muffin Fan
1 ea.. Corner rack shelf, rubber coated (This is where you sit the water
dish for humidity)
1 ea.. 2'x3' Florescent Light Diffuser Panel, Square Pattern
2 ea.. Pieces of 1"x1"x19" Pine Molding
1 ea.. 17" x 17" piece of Plexi Glass for door
1 set Small Cabinet Hinges for door
1 ea.. Digital Thermometer/Hygrometer
Dimensions:
19"D x 21"W x 24"H
How it all goes together:
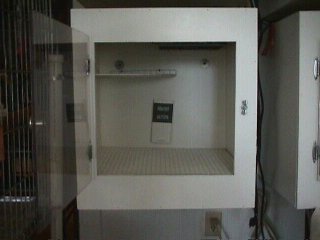
Cut Melamine to make a box to fit the above dimensions. Cut door opening in front of box, 16" x 16". Drill hole through top of box to pass electric cord for heating element through. Mount the door using the cabinet hinges. The door is not designed to fit snugly around the opening. Fresh air will be drawn in from around the door for ventilation.
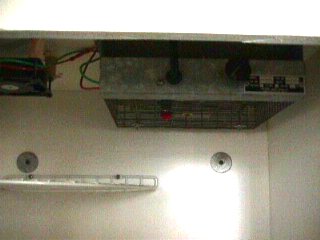
Mount heating element into top, inside of box using 1/4" wood screws. Wire Muffin fan to power terminals on heating unit and mount muffin fan inside to the top. Use small bird toy beads for spacers between fan and top of box. Mount the wire rack in the corner. We also use a digital Thermometer/ Hygrometer available from Radio Shack which is mounted low on the back wall at the approximate height the chicks will be.
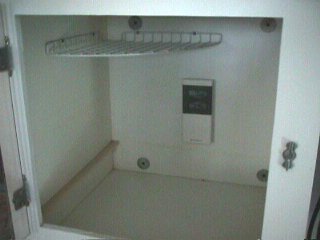
Mount the 2 pieces of 1 " x 1" on either side approximately 2" from the
bottom. This is what the grating will rest on.

Cut the Florescent Light Diffuser Panel to fit snugly inside the box on the 1 x 1 supports.
FINISHED
This brooder will give you years of service and provide a controlled environment necessary for your chicks development at a fraction of the cost. Although it is a bit more labor intensive to operate, the money saved and the additional space are well worth it. I have a few ideas to upgrade this brooder and will be trying them out in the near future. Please check back for the latest upgrades.
MODIFICATION
Adding a filter to clean the air of dander and dust.

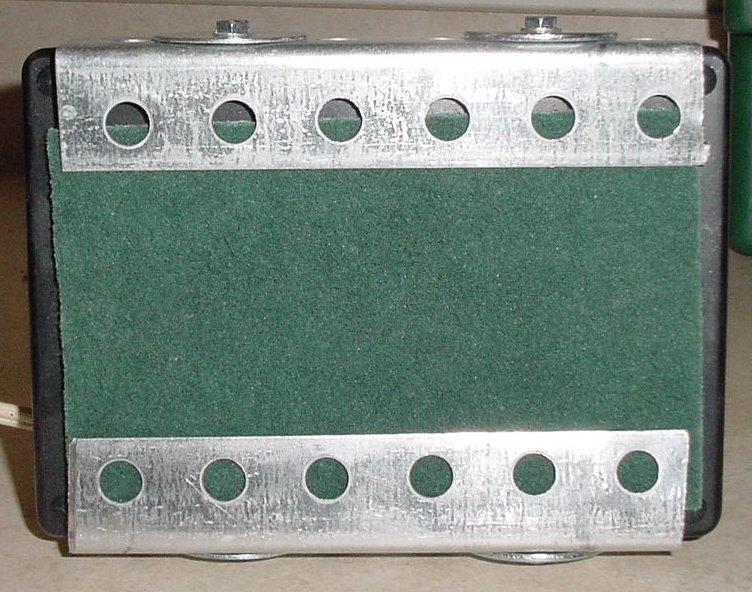
Front & Rear View
Materials:
1ea. Project Enclosure (Plastic Box) 7" x 5" x 3", Available at Radio Shack
1ea. Muffin Fan, 115 VA/C, 50-60 Hz, 3 5/8" x 3 5/8" x 1", Available at Radio Shack, (May use one you have if it will fit box)
2ea. "L" Brackets, 1" x 1" x 6", Available at Home Depot or Hardware Store
8ea Self tapping Hex head screws (Or any hardware suitable for attaching fan and brackets to box)
1 pkg. Scotch-Brite Heavy Duty Scour pads, Available at Grocery Store
Construction:
- Cut a circle 3 1/2" in diameter in center of box cover, (Metal or Plastic).
- Mount fan to cover making sure the flow of air will be out of the box when the cover is reattached to the box.
- Cut a 3" x 5" rectangular hole in bottom of box.
- Mount "L" Brackets to sides of box leaving a space to slide the Scour Pads into so as to cover the rectangle opening cut into the bottom of the box.
- Drill a hole in the side of the box to allow the wiring for the fan to pass through.
- Attach the wiring to the fan, pass it through the hole in the box and install the fan and cover onto the box with the screws provided.
- Place the Scour Pad in the brackets over the opening in the bottom of the box.
- Mount the box in the top of the brooder in a position that will allow for easy access for changing the filter pad.
- Wire the fan to the power terminals on the heating unit so the fan runs continuously.
All Done