Homemade Rabbit Cages
The best homemade rabbit cages are built of welded wire. Wire cages are more durable than wooden cages and are less expensive in the long run. Wire cages reduce the incidence of disease because they are easier to clean and disinfect.
The major consideration in selecting a rabbit cage is to get one that is self-cleaning. Time used in cleaning can be better used on other phases of rabbit production. No part of the floor should be solid, nor should a loose board be placed in the cage. Diseases commonly spread from dirt, moisture, and droppings remaining on these areas.
Wood is not a desirable material for cage construction. Rabbits gnaw on wood. It absorbs water and urine, making good sanitation more difficult. If wood is used it should be limited to the framework. Inner portions should be made of wire. Avoid treated wood if it is in contact with rabbits because it may be harmful.
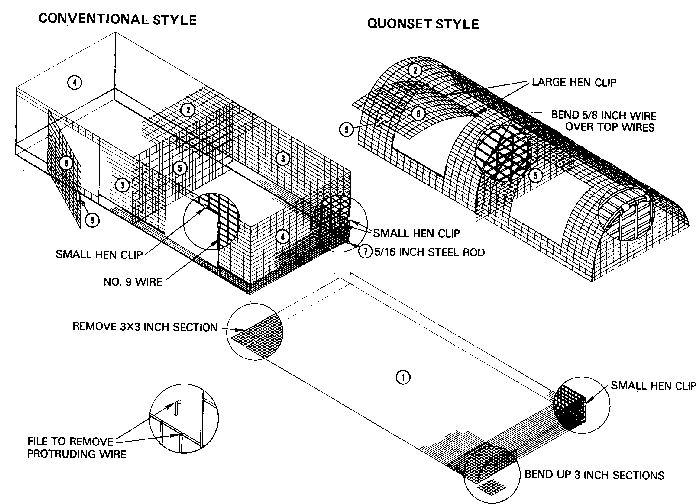
Many cage designs are manufactured. The basic cage used in most rabbitries is 30 inches wide, 36 inches long, and 18 inches high. Most have rectangular sides (conventional style), but some have rounded tops (quonset style). Doors may be hinged at the top, sides, or bottom.
Rabbit cages are usually suspended from the ceiling of the rabbitry building using No. 12 wire. Sometimes they are placed on a framework supported by legs. Either method requires some type of cover to protect the rabbits from sun, wind, and rain.
Cages are often tiered or placed one above the other. The single-tier cages are easier to build, maintain, and clean but require more space and increase the investment cost per working doe. The decision to tier the cages must be made before cage purchase or construction begins.
The following plans outline the procedure for building one unit of two 30 X 36 inch wire single-tier cages. Each cage will house a medium-sized doe and litter or five to seven fryer rabbits. All wire for these cages except for the flooring consists of welded, 14-gauge galvanized wire with 1 X 1 or 1 X 2 inch grid openings. The floor is made of 16-gauge welded wire with 1/2 X 1/2 or 1/2 X 1 inch grid openings.
List of Materials
|
|
|
Conventional: |
Quonset: |
| FLOOR: |
(1)
|
1 piece of 36 x 78 in. wire |
1 piece of 36 x 78 in. wire |
| TOP: |
(2)
|
1 piece of 30 x 72 in. wire |
1 piece of 48 x 72 in. wire |
| SIDES: |
(3)
|
2 pieces of 15 x 72 in. wire |
|
| ENDS: |
(4)
|
2 pieces of 15 x 30 in. wire |
2 pieces of 18 x 30 in. wire |
| PARTITION: |
(5)
|
1 piece of 18 x 30 in. wire |
1 piece of 21 x 30 in. wire |
| DOORS: |
(6)
|
2 pieces of 16 x 18 in. wire |
2 pieces of 18 x 20 in. wire |
| MISC: |
(7)
|
|
3 pieces of No. 12 galvanized wire |
|
|
(8)
|
2 pieces of 72-in. sections of 5/16 in. steel rod for floor |
2 pieces of 72-in. sections of 5/16 in. steel rod for floor |
|
|
(9)
|
2 door latches |
2 door latches |
| FASTENERS: |
|
100
small hen-cage clips |
|
Construction
These cages are most easily constructed in units of two cages. Lay out the floor first by removing a 3 X 3-inch section from each corner of the flooring. Bend up a 3-inch section along each side of the floor to prevent young bunnies from falling from the cage. Attach the steel rods to the front and rear edges of the floor, using hog rings.
The partition and ends of the quonset cage are shaped using a pattern. Allow a 5/8 inch section of the wires to extend beyond the pattern. Bend these wires around a No. 12 edging wire.
Position the ends and partition on the floor and fasten them using small hen-cage clips. Attach the front and back sides of the conventional cages to the bent-up flooring. Do not fasten the partition to flooring in the area where the doors will be located. Fasten sides to the partition and ends.
Lay the top of the quonset cages over the floor, ends, and partition. Fasten to the front and rear of the flooring, using small hen-cage clips spaced every 5 inches. Raise the center partition and fasten to the top. Repeat the process with each end section.
Cut the door openings in the front side of each cage. Each opening should be 2 inches smaller than the doors in height and width. File all sharp protruding wires. Attach the doors, using large hen-cage clips as hinges. Attach the No. 9 wire around the door openings, using the large-sized clips. Install the door latch to complete the cage.
The cages can be suspended from an overhead support, using six strands of No. 12 galvanized wire. Attach a wire to each corner of the individual cages for proper support.
Prepared by Dr. Tom Smith, Jr., Extension Poultry Science Specialist
Publication 1422
Extension Service of Mississippi State University, cooperating with U.S. Department of Agriculture. Published in furtherance of Acts of Congress, May 8 and June 30, 1914. Ronald A. Brown, Director
This information was provided by: Mississippi State University Extension Service for educational purposes only